
2 月 . 14, 2025 12:49 Back to list
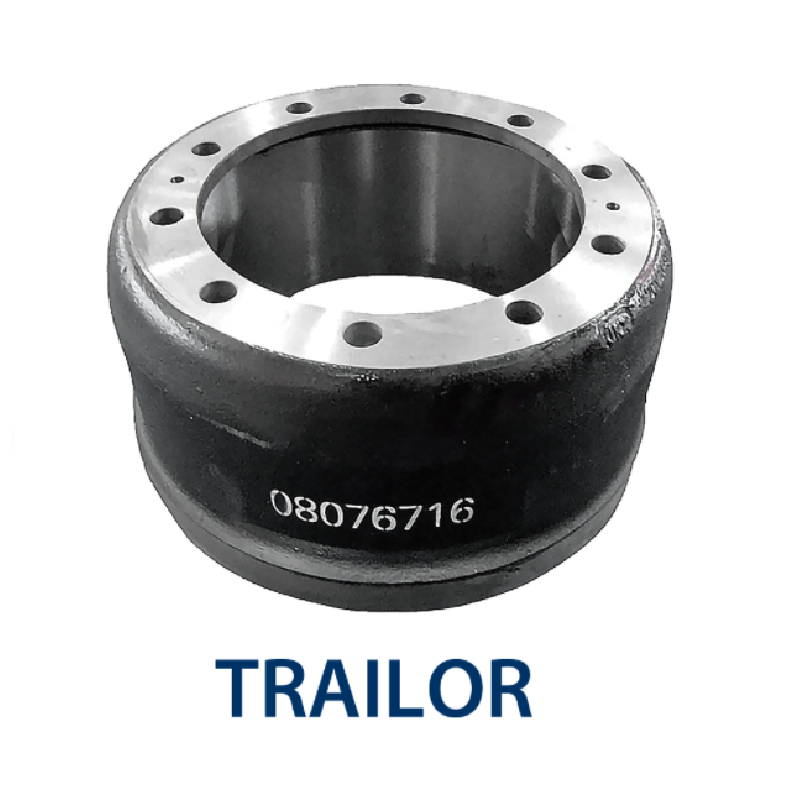
how to remove rusted drum brakes
Rusted drum brakes are a common issue faced by many vehicle owners. The removal process can be daunting, but with the right approach and tools, it can be handled efficiently. Here’s how to successfully remove rusted drum brakes while ensuring safety and vehicle integrity.
Persistence may still lead to a stubborn drum. In such cases, consider using a rust penetrant. Apply the penetrant where the drum meets the hub, enabling it to seep into the joint overnight. This lubrication can significantly aid in loosening the rust bond without damaging the drum integrity. Once the drum is detached, carefully inspect it for damage beyond rust. Consider the cost-effectiveness of cleaning versus replacement. If feasible, use a wire brush or sandpaper to remove surface rust from the drum. Wear safety goggles during this process to protect against rust particles. A professional inspection post-maintenance ensures brake system reliability. Consider consulting with a brake specialist to reaffirm brake component conditions. They provide valuable insights and advice on optimal drum brake care, ensuring peak performance. Finally, reassemble by first ensuring that the brake components are correctly aligned and then reattaching the drum. Secure the wheel and lower the car off the jack stands. Conduct a brake test in a safe, controlled environment to ensure the brakes are functioning smoothly. Trust in products and techniques lies in adherence to professional standards and equipment guidelines. The step-by-step process stated here respects mechanical integrity and promotes safety. Engaging with community forums or local experts can further enhance your understanding of specific vehicle nuances, building on shared experiences and expert opinions. Remember, the goal of any maintenance task is not only to resolve immediate issues but to extend the longevity and reliability of your vehicle’s components. Regular checks and timely intervention prevent extensive damage and ensure safe driving conditions. This responsible approach fosters trust and showcases expertise in vehicle maintenance.
Persistence may still lead to a stubborn drum. In such cases, consider using a rust penetrant. Apply the penetrant where the drum meets the hub, enabling it to seep into the joint overnight. This lubrication can significantly aid in loosening the rust bond without damaging the drum integrity. Once the drum is detached, carefully inspect it for damage beyond rust. Consider the cost-effectiveness of cleaning versus replacement. If feasible, use a wire brush or sandpaper to remove surface rust from the drum. Wear safety goggles during this process to protect against rust particles. A professional inspection post-maintenance ensures brake system reliability. Consider consulting with a brake specialist to reaffirm brake component conditions. They provide valuable insights and advice on optimal drum brake care, ensuring peak performance. Finally, reassemble by first ensuring that the brake components are correctly aligned and then reattaching the drum. Secure the wheel and lower the car off the jack stands. Conduct a brake test in a safe, controlled environment to ensure the brakes are functioning smoothly. Trust in products and techniques lies in adherence to professional standards and equipment guidelines. The step-by-step process stated here respects mechanical integrity and promotes safety. Engaging with community forums or local experts can further enhance your understanding of specific vehicle nuances, building on shared experiences and expert opinions. Remember, the goal of any maintenance task is not only to resolve immediate issues but to extend the longevity and reliability of your vehicle’s components. Regular checks and timely intervention prevent extensive damage and ensure safe driving conditions. This responsible approach fosters trust and showcases expertise in vehicle maintenance.
Latest news
-
Brake Drum for Kamaz Trucks Durable OEM Replacement & High Performance
NewsMay.30,2025
-
Brake Drum Man High-Quality Drum Brake & Shoe Solutions
NewsMay.30,2025
-
High-Performance Brake Drum for Kamaz Trucks Durable Drum Brake Components
NewsMay.29,2025
-
Brake Drum Man High-Quality Drum Brake Drums & Brake Shoes
NewsMay.29,2025
-
Brake Drum MAZ High-Performance & Durable Replacement Parts
NewsMay.29,2025
-
heavy truck brake drums
NewsMar.07,2025